Netbeans
- Diego Ongaro
- Stephen Yang
- Ankita Kejriwal
This guide is intended as an internal reference for RAMCloud Students working with Netbeans over the rcXX cluster.
Table of Contents
Decision Time (Source Location)
To work on RAMCloud in Netbeans, you'll have to decide whether to store your sources on your local machine and copy it to rcmaster at build time (SFTP) OR store the sources on rcmaster and use a remote mount to operate on the files (SSHFS). You'll have to choose one and the instructions below diverge depending on which you choose. Instructions meant for one or the other will be tagged with SFTP or SSHFS. If you are unsure which one you'd like, pick SFTP. Note that with SFTP, you are restricted making local modifications to your machine only; changes on the server will not be reflected on the client.
Installation
- Netbeans
- Download the C/C++ version of Netbeans here: https://netbeans.org/downloads/
- (Optional) SSHFS Only: Only set this up if you plan to use SSHFS on OSX.
- Go to https://osxfuse.github.io
- Download and install OSXFuse and SSHFS (in that order)
- After install, open Terminal.app (i.e. press Command + Space then type "Terminal")
- Create a mount folder on your Desktop (i.e. mkdir ~/Desktop/home )
- To mount, type "sshfs <username>@rcmaster.scs.stanford.edu: ~/Desktop/home" where <username? is your username.
- (To unmount later, use "umount <folder>")
Setting rcmaster as the BuildHost
- Open Netbeans
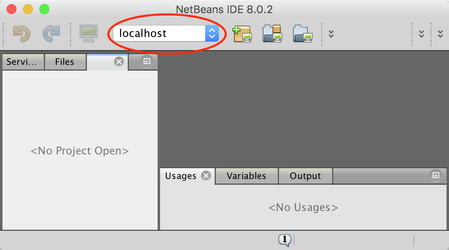
- Open the Remote Tool bar for NetBeans by going to View->Toolbars->Remote
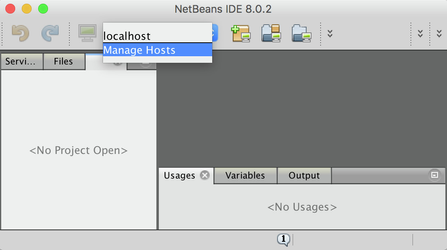
- Near the top left of the IDE, there should be an icon of a computer and the words "localhost" to the right of it. Click on "localhost" and drop down to "Manage Hosts"
 ...
... 
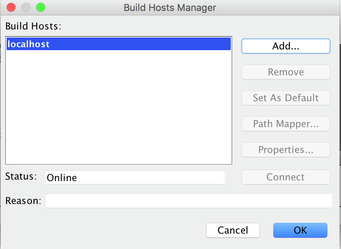
- A new window should pop-up, click "Add..."
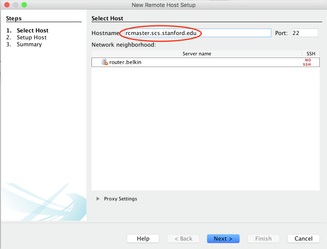
- In the next window, type our host name (rcmaster.scs.stanford.edu) into the hostname and click Next
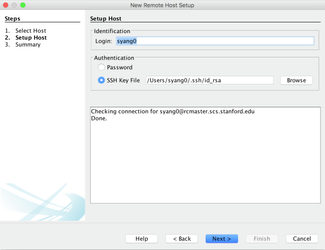
- The next page should be self explanatory, type in your username and select "SSH Key File." Press "Next". If it prompts with a password, enter your password for the SSH file (NOT the one for rcmaster).
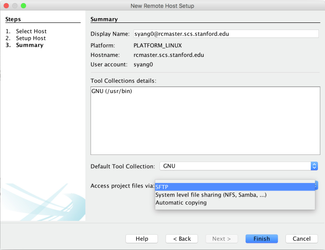
- On the last page, you will need to change the "Access project files via" depending on how you wish to access your files.
- SFTP: Select this option if you wish to store the sources locally
- SSHFS: Select "System level file sharing"
Setting up project RAMCloud in Netbeans
- Checkout the sources and initialize according to the instructions on General Information for Developers
- SFTP: Checkout the sources in a local directory (Note: Win Users, you will have an extra step).
- SSHFS: SSH into rcmaster and checkout the sources there
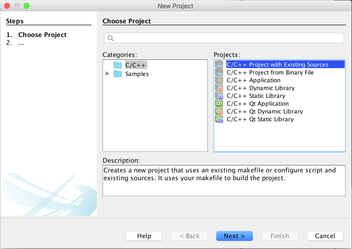
- Open Netbeans and click File->New Project
- Select "C/C++ Project with Existing Sources" and click Next
- In the next window, "Browse" to where you checked out the sources and select rcmaster as the build host
- SFTP: Browse to where the RAMCloud folder is are on the local machine
- SSHFS: Make sure rcmaster is mounted (see Installation) and browse to the RAMCloud folder
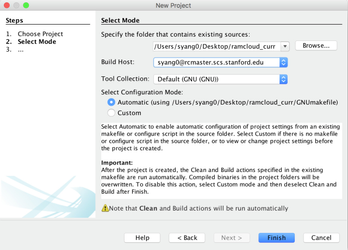
- Click "Finish"
- Windows Users: For some reason, not everything gets copied over correctly. Please follow the instructions in Troubleshooting - "I'm on Windows and I get a build error!"
- SFTP Only: To make life a little easier, you should make a symlink from the copied files to your home directory.
- Notice that when you build, it says that it's copying your files to a location
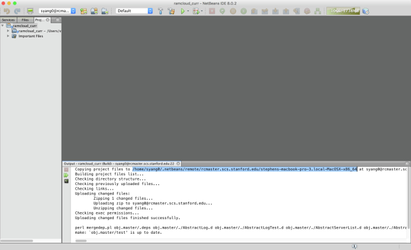
- cd to that location and go down until you reach what looks like the RAMCloud directory
- symlink that over to wherever you want.
- Notice that when you build, it says that it's copying your files to a location
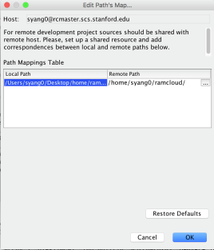
- SSHFS Only: If you are mounted over sshfs, the IDE will ask for your local to remote mappings. Simply click right below "Local Path" and browse to where RAMCloud is locally and then click right below "Remote Path" and browse to where RAMCloud is on rcmaster.
Creating Build and Unit Test Enviroments
After you complete the previous session, Netbeans will try to make the project, but it wont have the correct configuration. Follow these instructions to be able to build and debug unit tests.
- Right click on your RAMCloud project and click Properties

- Click "Manage Configurations" on the page that pops up
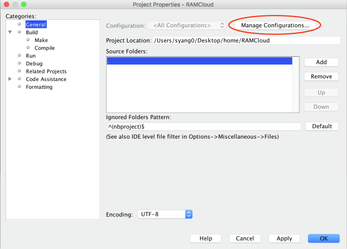
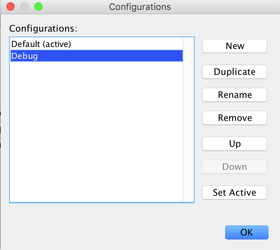
- Click "New" and create one called "Debug" and press OK
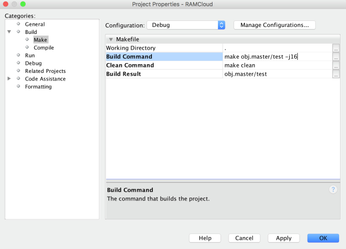
- Under Build->Make, the following
- Build command "make obj.master/test -j16" (note, change 'master' to your branch name)
- Clean Command "make clean"
- Build Result "obj.master/test" (note, change 'master' to your branch name)
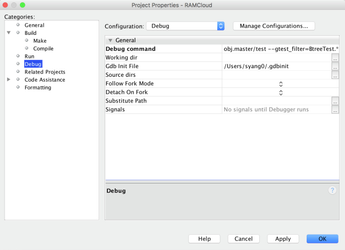
- Under "Debug" change the following:
- Run Command: "obj.master/test" (again, change master to branch name)
- Note: This is where you can put in --gtest_filter=... to filter the tests
- Run Command: "obj.master/test" (again, change master to branch name)
- Click "Apply"
- Now on the top bar, change your configuration to "Debug" and use the hammer to build

- Then to test if it was successful, click the play to run the tests or the one next to play to debug!
- Enjoy!
Advanced Tutorial: Debugging on the Cluster
There will be times when you need to debug a Master/Coordinator/Client that's running on the the rcXX machines instead of the coordinator. To support debugging these problems, we'll have to (a) setup a new build configuration (b) tunnel through rcmaster to the rcXX machines, (c) create a new build host, and (d) debug of course!
- Setup new Build Configuration
- Follow Steps 1 and 2 from "Creating Build and Unit Test Environment" For reference it's...
- Right click on your project and go to properties
- Click "Manage Configurations"
- Click "New" and name the configuration "Cluster" and click OK, OK.
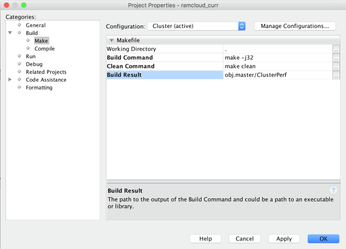
- Under Build change the following
- Build Command: make -j32
- Clean Command: make clean
- Build Result:
- If you are debugging the coordinator, select obj.master/coordinator
- If you are debugging a server, select obj.master/master
- If you are debugging clusterperf, select obj.master/ClusterPerf
- Again, change 'master' to your branch
- Click Apply
- Build the project with the hammer button
- Follow Steps 1 and 2 from "Creating Build and Unit Test Environment" For reference it's...
- Tunneling through rcmaster
- Create a tunnel from rcmaster to an rcXX machine. For example
- ssh -L 2222:rc80:22 <username>@rcmaster.scs.stanford.edu
- This will map port 2222 on your local to port 22 on rc80
- ssh -L 2222:rc80:22 <username>@rcmaster.scs.stanford.edu
- Test out the port forwarding
- If you did my example, you should be able to do "ssh localhost -p 2222" on your computer and instantly be connected to rc80
- Create a tunnel from rcmaster to an rcXX machine. For example
- Create a new fake build host
- Follow steps 1-3 on "Setting rcmaster as the Build Host." For reference, they are
- Open Netbeans
- Click on "Manage Hosts"
- Click "Add"
- In the window that pops up, fill in the following:
- Hostname: localhost
- port: 2222
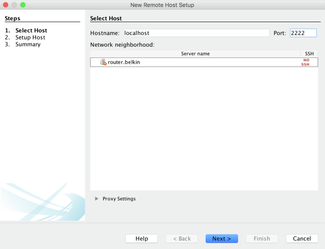
- Click next, select SSH
- Click Finish
- Follow steps 1-3 on "Setting rcmaster as the Build Host." For reference, they are
- Actual Debugging
Now at this point, you should have everything setup for debugging. The specifics of what to do next are highly dependent on your project, so I will only outline what to do.- Start up your cluster
- In Netbeans, click to the right of the debug button and drop down to "Attach Debugger"

- In the new window that pops up,
- Select the Host as localhost:2222
- Use the filter to filter out your project (i.e. obj.master/server)
- Select the process you're interested in
- Select RAMCloud as your project
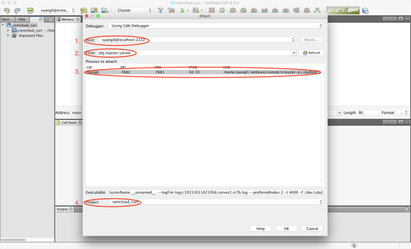
- Click Okay and you should be attached
- Set your break points and run your test
- Enjoy!
Troubleshooting
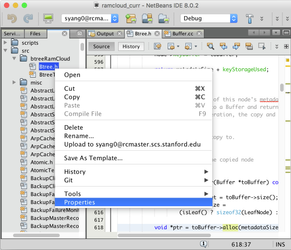
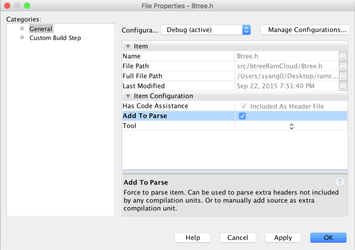
Q: Netbeans wont parse a file!
A: You can manually specify which files Netbeans should parse. Right click on the file, click "properties," and check the "Add to Parse"
Q: Netbeans is slow on my Macbook Pro Retina/High Resolution display!
A: The performance bottleneck is actually due to a Java issue (more info https://netbeans.org/bugzilla/show_bug.cgi?id=237724 ). To fix this, update your Java to at least JDK 8u66 and reinstall Netbeans. To be sure Netbeans is using the correct version, launch netbeans and go to Netbeans->About Netbeans. If you updated to 8u66, you should see something like this in your about window:
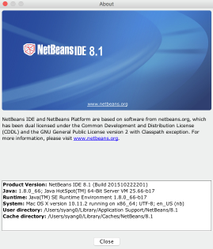
If the Java version does NOT match the one you installed, then you need to set it in the configuration of Netbeans. To do this on OSX, you need to open the following file:
/Applications/NetBeans/NetBeans*.app/Contents/Resources/NetBeans/etc/netbeans.conf
then replace the netbeans_jdkhome path to your jdk installation. For example, mine is
netbeans_jdkhome="/Library/Java/JavaVirtualMachines/jdk1.8.0_66.jdk/Contents/Home/jre"
Q: I'm on Windows and I get a build error!
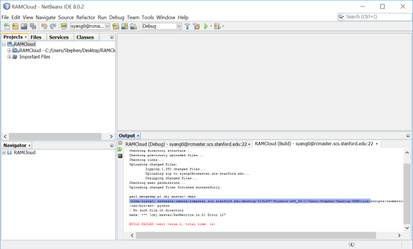
A: For some reason, on Windows, not all the executables (like bindings/java/gradew) copy over, so you should clone the RAMCloud again on rcmaster and then copy it over manually. This only needs to be done once.
- ssh into rcmaster and follow the instructions here General Information for Developers
- Look at the build error and find where Netbeans is copying the files (see screenshot).
- On rcmaster, copy over your new checkout from step 1 to location found in step 2.
- For example, the command for syang on PC is " cp -R RAMCloud/* /home/syang0/.netbeans/remote/rcmaster.scs.stanford.edu/desktop-2tfo897-Windows-x86_64/C/Users/Stephen/Desktop/RAMCloud"
- Now press the Hammer (build) and it should work!
Legacy Netbeans Tips
Anti-aliasing: http://thomashunter.name/blog/enabling-anti-aliasing-in-the-netbeans-editor/
To fix parsing issues with standard defs (such as size_t) do the following:
- Right click on the ram cloud project and select properties.
- Under "Code Assistance -> C++ Compiler -> Include Directories" add the following line.
- src;obj.master;gtest/include
Parsing C++11 Foo<Bar<Baz>> is broken in 7.2. Apparently this is fixed in the dailies: http://netbeans.org/bugzilla/show_bug.cgi?id=179939#c15 . Diego tried this with mixed results. The daily (8/30) seems stable, but it doesn't always parse the >> properly.
Under project build options, make sure you set your C++ standard to C++11. There are some other preprocessor macros you probably want to define so that NetBeans' parser will follow the #ifdefs properly.
- __GXX_EXPERIMENTAL_CXX0X__
- _GLIBCXX_USE_C99_STDINT_TR1
LogCabin's scons build copies all the source files to the build directory. Then when there are compiler errors, they are at build/Foo/Bar.cc. If you click on them, NetBeans opens the build cc file, which will soon be blown away. A work-around is to set the compile command to: sh -c "scons 2>&1 | sed 's/build\///'"